.blog-menu-desktop ul {
background-color: #F1F1F1 !important;
width: fit-content;
float:right;
}
.blog-menu-desktop li {
display:inline-block;
font-weight: 600;
padding:0 15px;
vertical-align:text-top;
}
.blog-menu-desktop li a {
color:#000000;
}
.blog-menu-desktop li a:hover {
color:#E00519;
background-color: #F1F1F1;
}
.selected_category {
color:#E00519 !important;
}
.separator-border {
border-left:2px solid #000;
height:15px;
display:inline-block;
}
#misterworker-blog-menu .btn-primary:hover{
background-color: #e00819;
}
#misterworker-blog-menu-content ul {
background-color: #e00819;
padding: 10px 20px !important;
}
#misterworker-blog-menu-content ul > li {
margin-bottom:5px;
}
#misterworker-blog-menu-content ul > li > a {
color: #fff;
}
#misterworker-blog-menu-content ul > li > a:hover {
background-color: #e00819;
}
HOW TO CHOOSE A PROFESSIONAL PLANER FOR WOOD
Published :
07/12/2017 16:53:59
Categories :
Mister Worker
, Professional working tools guide
Today I want to talk to you about a very well-known manual woodworking tool that tests the skill of a craftsman: the planer. It is an instrument that has its origins in ancient Egypt, and to use it to the best one must have excellent manual skills.
The world of planes is really varied: even a carpenter can get confused when it comes to distinguishing with confidence between a top rail, a roughing or a finishing plane. It is therefore a world in which it is very easy, but also pleasant, to get lost. That’s why I want to explain how the planes work and give you some advice on how to best use them.
HOW IS A PLANER MADE?
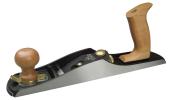
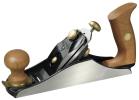
A planer is composed of a block, the main structure, which is suitably shaped to accommodate all the other pieces. The block can be made of metal or wood, or it can be made of wood with a metal sole applied. The sole, as it is easily understood, is the part that will come into direct contact with the planing surface, and has a slit of variable thickness oriented transversely to the long side of the sole (from 90 to, generally, at 45 degrees ). The slit, which allows the blade of the planer (often called a knife or iron) to come out, can, depending on the shape of the log, present a hole (or jaw), or a vertical opening that starts from the slot and it crosses the stock and facilitates the removal of the chips. The plane iron is stopped through a wedge, also called a cone or drone. The same is stabilized either through lateral grooves in the housing jaw, or, in case of iron and cast-iron planes, by a knob fixed through a screw for adjustment, to a support that starts from the sole. Finally, do not forget two other really important parts of a planer: the handles and the counterforce. There are two handles, one in front and one in the rear, whose shape varies according to the type of planer and its intended use. The front handle serves to exert (and maintain) the pressure necessary for the blade to sink into the wood, the back to impart the horizontal movement of pushing or pulling. I’ll talk soon about the back iron.
-
GEOMETRY OF A HAND PLANER
Here you will find some notions about what we could define as the elementary geometry of a planer. A planer is indeed made up of the pieces we have named (on whose shape and on whose names one could quite possibly pour a lot of ink), but it is also an entity made of CORNERS: in a hand plane there is three main angles: the sitting angle, the bevel angle and the cutting angle. Let’s briefly see what they are and how they relate to each other. The sitting angle is simply the angle with which the plane iron is mounted on the block, or the acute angle formed by the blade with the sole. The angle of bevel is the angle with which the iron is sharpened, that is, once the vertical section of the knife of our planer has been taken, the vertex of the triangle that this section has at the sharp end. The cutting angle is instead given by a combination of the two measures just mentioned, and varies with the variation of the knife position. This can in fact be positioned with the bevel angle facing downwards (BEVEL DOWN) or facing upwards (BEVEL UP). In the first case the cutting angle and the sitting angle coincide; in the second case the cutting angle is instead given by the sum of the bevel angle and the sitting angle. At this point, let’s finally take a look at the Stanley wood planers series.
-
THE BACK IRON
The back iron increases the angle at which the chips are ejected and makes a significant contribution to avoiding fiber tearing and consequent irregularities on the planing surface. The counterfoil, carrying out a function in many ways similar to that of the bevel upwards, does not have to be present in the planes that mount an iron in BEVEL UP mode. However, in addition to facilitating an easier ejection of the chips, the counter-iron also has a function that we could call “static”: it increases the solidity of the cutting unit, ensuring greater strength that, in fact, translates into the reduction of the so-called chattering. What is that? Literally: the skip of the blade on the planing surface, due to the reduced stability of the blade. Name apparently sought, then, for a small but harmful nuisance that carpenters well know. Another small piece of advice, which at most will appear superfluous, but in truth it is not: the closer the back iron is to the blade, the thinner the chips will be, and therefore the planing work will be more uniform and continuous. Seeing is believing.
STANLEY PLANERS
Historical brands such as Stanley have been able to reinterpret this tool in numerous versions, where the aesthetic care of details, practicality and ergonomics combine with the extraordinary functionality, the result of a now secular knowledge and a tradition that goes back, in the case of Stanley, to the mid-nineteenth century. Woodworking equipment enthusiasts certainly do not ignore the fascination that a vintage Stanley plane has in their hands, that patina due to the wear and tear of decades of hard work that the tool presents on the surface, but also the extraordinary results that high quality manual tools can guarantee even after a century of employment (perhaps with a few years of rest in the toolbox of a progenitor). With us you will not find the collectible versions of these tools, but the latest news always updated in the Stanley catalog: planes, planers and top rails in which the unchanged care for aesthetic detail goes hand in hand with the quality and robustness resulting in decades of technological innovation. But do not forget the words and numbers we have mentioned so far: from time to time, you will need this data to understand which product is right for you, and this applies to all the planer brands. Knowing how to safely read a technical data sheet is just one of the many factors that turns a simple user into a true and safe professional.
-
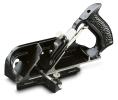
THE TOP RAILS
Let’s now see what distinguishes a top rail from a standard plane. A top rail is a thin planer, in which the width of the sole never exceeds ten centimeters and in which the iron width and sole coincide. Said more simply: the top rail is able to work in full width and is used to work on the “banks”, ie at the edges and in the presence of corners. In particular, I would like to talk to you about two Stanley top rails: the first is the Stanley planer 1-12-078, besides being, as usual, a highly professional cutting tool, it also has a couple of very useful features. First of all, it is provided with two different cutting positions. What does it mean? Easy, it means that the iron of the planer, with its counterforce and the fixing and adjustment system, can be mounted in two different positions along the sole, or at the head or in the middle of the same. This is obviously not an aesthetic quirk born from the minds of the best designers: the blade positioned at the top of the sole allows in fact to plan perfectly wooden corners delimited by vertical frames, since the entire surface of the sole becomes useful surface at work. Furthermore, the cutting depth is adjustable, as is the lateral alignment system, which is made up of a small arm that protrudes from the planer frame on which a guide with adjustment screw is mounted. An elementary system of guides to keep the exact distance, but made even more resistant and functional by the fact that the planer has a mono-block body, with ground base and shoulders. All this in a 3.8 cm wide and just over 25 cm long top rail.
Those looking for something smaller can not do without the extraordinary Stanley shoulder plane ST-438: technique, design and high performance concentrated in just over 10 and 14 centimeters. And yet, in all this compactness, throat and iron are adjustable, for a guaranteed precise work in all situations. And again, we pay attention to another feature of planes 90 and 92, or the thickness of the knife. In a planer the thickness of the knife is a specific one of crucial importance: when choosing the thickness of a blade for planers it is indeed a right combination of comfort of use and capacity, through increased thicknesses, to avoid overheating and always maintain optimal sharpening. Briefly: a thin blade will be able to give you great cutting performance, but the sharpening intervals will be much shorter, since small deformations due to overheating will occur.
-
THE LONG PLANER
As said before, the top rail is a tool for edges precision finishing. But there is another type of planer for precision work, the long planer. The length of a planer is not in fact something to be underestimated and is also a decisive factor when it comes to performing precision work. The greater the length of the sole, the greater will be the portion of the surface brought to the same level by the planing operation. To give you the idea without going into too technical matters, here is a practical example: if I support a rigid bar on a surface to check for any curvature, the greater the length of this bar and the greater the precision with which you can identify even the smallest deviations from the straight line. Those looking for a long plane that serves this purpose can not look past the long version of the Bailey Stanley planer: a manual tool with cast iron body and ground base available in three versions, with a length up to 56 cm. However, let’s also review all the other planes.
-
SHARPENERS AND SMALL PLANERS
To cover all ranges of lengths and widths, Stanley offers a truly complete series of planers, with a great range of widths and lengths, the possibility of a double cutting position and very different finishes. Among these the Stanley SB3, Stanley SB4 planers, cast iron models, professional and affordable available in the 210×44 and 245×50 mm versions, equipped with a simple and robust mechanism for adjusting the depth and alignment of the iron through telescopic screws; unmistakable patterns with their red counter-dial. Then, there are the Stanley RB5 and Stanley RB10 models. The RB5 model is a compact planer, with a total length of 150 mm for a 50 mm iron. Equipped with a double cutting position and a practical blade holder integrated into the handle, it is sold with two spare blades included. A professional, versatile and convenient tool. The Stanley RB10 is actually a multi-purpose planer: a few inches bigger than its younger sister (260x50mm), it is ideal for both finishing and roughing jobs, equipped as always with depth and alignment adjustment, it is supplied with six original irons. Then we have the Handyman plane: it is a planer with an increased height, which is why it has a groove, even though it is a metal plane. You can find this in 3 versions, up to a maximum size of 355×50 mm. And for those who love details in wood and professionalism at its peak, there is the extraordinary Stanley Plane, a hand plane in which the material is primarily what counts: steel body, brass adjustment screws, front knob and cherry wood handle. And let’s not forget, in this overview, the gray and red cast-iron planes, produced with two different cutting angles, from 13 or 21 degrees.
We close with some technical details on what is the heart of a planer: the knife. The replacement blades for Stanleys planers are all in hardened and tempered chrome-carbon steel. A great sharpness seal guarantees both the ability to re-sharpen the knife completely and to make it last for years. And to make sure you do not miss anything, there is a practical Stanley sharpening kit for you, also ideal for chisels, made up of a double-grained oil stone and a guide with sharpening angle adjustment notches. Or a little jewel: the Stanley diamond sharpener, ideal for sharpening all cutting tools. In the shape of a sharpening stone in its case, the sharpening surface is, however, made of diamond stone of two different grains on both sides.
HOW TO HAND PLANE
You should remember that planing generally takes place in many steps, and that at the end of each of these steps it is up to the craftsman’s inspiration, sensitivity, attention and patience to decide how to continue according to his goal. There are many possible suggestions for making a perfect planing. Let’s talk, for example, about how we should press the force, in a horizontal and vertical direction. It is clear that, by starting the planing work, more pressure will be exerted on the front part of the plane so that the blade can “bite” the wood. Then, it will be necessary to increase the force exerted horizontally in the thrust or pull of the tool. Once again, it is a matter of developing a sensitivity that allows us to recognize how to proceed, in relation to everything that is involved in planing: the shape and the quality of the wood on which we work, the planer to be used, the position and the strength of the human operator. I’ll be honest: the variables are many so I’m careful to take it all into consideration. As we have seen the manual planes, far from being a legacy of the past and instruments for nostalgia, are instead precious allies for very precise finishing jobs where the technology (think of the power and yield of an electric planer) holds the side for a moment to experience and expertise. I am not saying that anyone can approach a planer or a thick planer, far from it. The workshop equipment that also requires great savoir faire, but we’ll talk about this again.
Related products
No 78 Rebate Plane
Bailey® Professional Bailey…

No 4 Bench Plane
No 62 Jack Plane -…